
I admit it. I stink as a photographer. Since getting really great photos is one of the biggest factors in succeeding on Etsy, that's a problem. You'd think photography talent would go hand in hand with being a graphic designer, but I'm living proof to the contrary. I appreciate great photos, and I certainly want to showcase my products to the best of my abilities, but when it comes right down to it, I'm just not interested in learning all the ins and outs of photography. It's too technical and (this is going to sound weird since I make jewelry) a bit too fiddly for my liking. I'd rather be making jewelry than figuring out how the aperture setting on my camera works.
So, lucky for me, I have a husband with a great eye and an interest in photography. Even so, up until now, his interest has been landscape and wildlife photos. That doesn't translate terribly well into product shots. Getting good photos of my jewelry and other small items for my etsy shop had been pretty hit and miss over the last couple of months. Practice really does make perfect, I guess, because I've noticed a real improvement as of late. Amazingly, I've been learning along the way as well, despite my lack of interest in photography. Who knew this old girl could learn some new tricks after all!
One thing I've learned is that the right lighting is the single most important factor in getting a good picture. And, getting the light right can also be the most illusive and frustrating part. But, as evidenced by the before and after pictures below, I think we (and most of the credit really goes to my wonderful husband here) finally have it figured out! Yay!
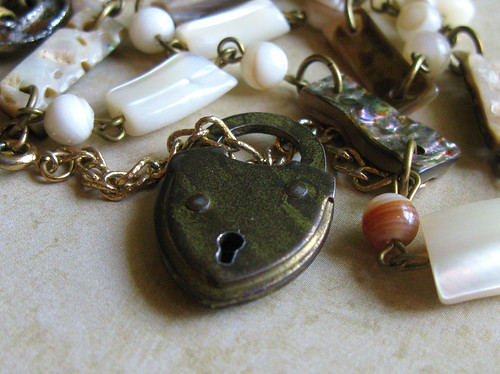 |
| Before - I just couldn't manage to capture the vibrant gold colors in this necklace, even using indirect natural sunlight as many photography blogs and forums recommend. It just looked flat. |
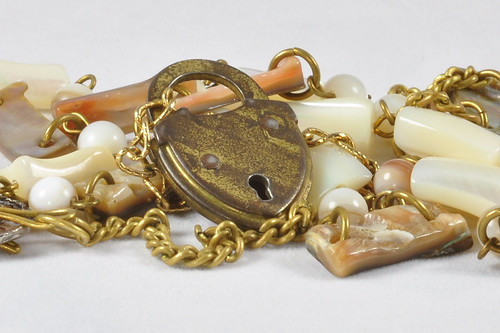 |
| After - The right light makes all the difference. Just look at the rich colors! I'm so happy to finally have a photo that does this beautiful necklace justice. |
Stay tuned over the next several weeks for a series of posts on product photography tips for non-photographers, specifically those who'd rather spend their time making and listing things than playing with their cameras. I plan to share all the tricks and secrets I've learned to help out others who are struggling to take better pictures like I was. More soon...
Wow!! the difference is amazing!
ReplyDeleteThey look like totally different pieces~
Love how the texture on the lock came out on the after photo! well done! :)
Fab picture the details are just awesome! I know what you mean about good pics. I still need to redo some of my shots. I just finished making a light box and played with the settings on my Nikon D3000 to adjust the lighting I did a test shot of one of my painted boxes I just finished. It has a great deal of detail and huge amounts of swarovski crystals so I needed to make sure the shot captured all of it. so happy with the outcome. Now I can start retaking pics to post my items on my main web site also etsy shop.
ReplyDeleteThanks!! Having a light box helped a lot. The main thing that made the difference was getting enough light and light that was all the same color temperature. The lights I had before were a combination of halogen and CFC and I ended up lightening all my shots or adjusting the colors on the computer. Four 100 watt equivalent CFCs made worlds of difference.
ReplyDeleteMaggie - I'd love to see your painted boxes. They sound amazing.
Great information! Glad I found you!
ReplyDelete